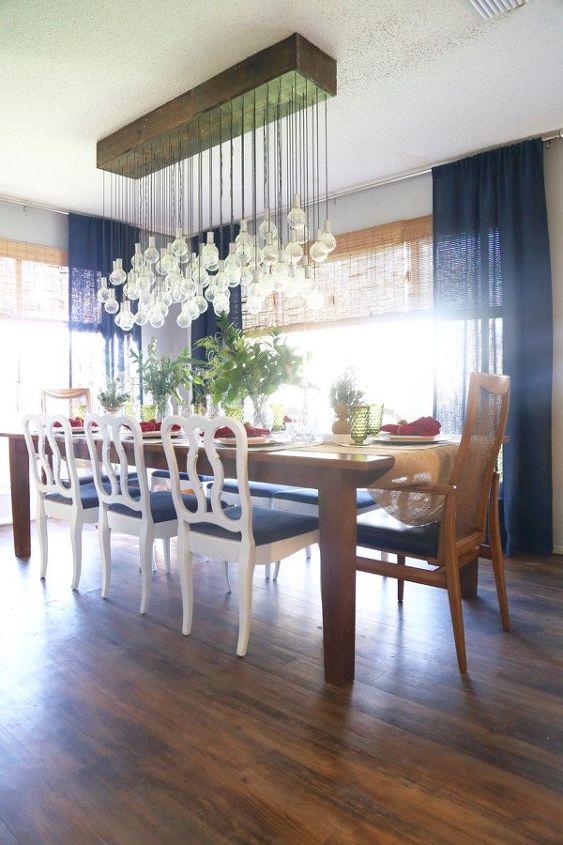
 This project is my absolute favorite thing
my husband and I have ever created! It’s the absolute focal point of our entire downstairs, and it never fails that someone asks about it every time they come to our house!
It’s much simpler to create than it may look, and we created it from absolutely nothing! The full tutorial is quite involved, so I’ll give the highlights here, but you can click over to my blog to see all of the details.
Let’s get to the explanation.
To make this project, you’ll need:
– 1 6-foot 1X12 board
– Stain in your favorite shade
– 80 globe light bulbs
– 8 light sockets (we used these)
– Approximately 24 feet of braided electrical wire (like so)
– 12-feet of 1 electrical conduit
– 72 3/4 knock-out seals
– Approximately 175 feet of braided rope
– Silver spray paint
Start by cutting your board down to the desired length (ours is 5 feet long) and marking where you want your lights to go. This is an imprecise process, and involves a lot of trial and error – full details of how we did this can be found on the blog post.
Next, we built and stained the box that our lights would hang down from. The sizing all depends on your room and how large you want the fixture to be!
We built faux light sockets out of electrical conduit for all of the light bulbs that weren’t going to be functioning (we have 80 light bulbs in the fixture, but only 8 of them actually work). See the blog post for details on how these were created, but we used electrical conduit and knock-out seals to create them.